If this is your first visit, be sure to check out the FAQ by clicking the link above.
You may have to register before you can post: click the register link above to proceed.
To start viewing messages, select the forum that you want to visit from the selection below.
Professor Pink | Mrs. Bruce Wayne | I'm on a Goat | Glitterpuff | Dumbledore's Defense Squad | BHB
Did you all vote? If not, you still have 24 hours to pick your favorite four!
__________________
yeah, there's one thing about me that you should know________________________________ __________________________________________that I can't help from speaking my mind
Professor Pink | Mrs. Bruce Wayne | I'm on a Goat | Glitterpuff | Dumbledore's Defense Squad | BHB
Hi all! Sorry for the long delay from the end of the last round til now. But here are our amazing winners!
Round Three
In fourth place, we have hermygirl!
Third place goes to the awesome Roselyn!
In second place we ALSO have hermygirl!
In first place, our winner is.... sweetpinkpixie!!!!!
Congratulations to all who entered and voted, and again, thank you ALL for the fabulous turnout!!!!! A complete list of who entered what is below. Please remember to credit the graphics-makers if you wear their icons.
Next challenge + advice from our third, third-place winner will be posted soon!
__________________
yeah, there's one thing about me that you should know________________________________ __________________________________________that I can't help from speaking my mind
Professor Pink | Mrs. Bruce Wayne | I'm on a Goat | Glitterpuff | Dumbledore's Defense Squad | BHB
An Icon Competition; Use the Word Below:
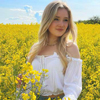
fall
The above theme must be prominently featured in your icon. But you do not have to have the word 'fall' in it.
You are allowed to enter up to TWO 100 x 100 and under 20 kb icons.
Entries are ANONYMOUS. Do NOT tell people which are yours or post/tweet/VM/IM/etc. clues about your entries.
You have ONE WEEK AND A HALF from the date and time of this post to PM me your entries. So let's say your entry should be in by OCTOBER 31 at 2:30pm EST.
Good luck!
Our last third-place winner, Roselyn, had this great advice for us on how she made her third-place icon in 1w1p: round three. Rose has also won fourth in round two!
SPOILER!!: Rose's advice and tippy tip!
Feel free to really experiment with your graphics. Get out of your comfort zone and try something new. What I've recently discovered I liked doing was darkening the whites of an image to lower the contrast between the dark and light colors. While the image won't have that crystal clear "pop", it'll give the image a more vintage feel to it. There are two ways you can do this.
FIRST: The Selective Color Tool
Step 1: Go to Layer > New Adjustment Layer > Selective Coloring. Mess around with the rest of the coloring if you'd like beforehand, but the important step we're going to do will be in the "Whites" coloring. You don't need to change the amount significantly. Sliding the last arrow to the RIGHT side will darken the whites.
WHITES
0
0
0
+15
→
SECOND: The Darken Color Layer
Step 1: Create a new layer, preferably on top of your other layers. Fill the layer with a solid color. Darker grays usually work well, but it's up to you on what color fits best with the image. I used a #e2af9e for this picture, which is a sort of mellow pink.
Step 2: Change the layer setting to "Darken". You'll want to lower the opacity of the layer, and depending on the picture and your color, that could be as much as lowering down to 10%. I lowered the opacity down to 50% here.
→
And there you have it. :3
Good luck to all entering Round Four! Hope this tip helps!
__________________
yeah, there's one thing about me that you should know________________________________ __________________________________________that I can't help from speaking my mind
Wizarding World RPG Admin Minister for Magic DoM & MO Alley Proprietor
Romanian Longhorn
Join Date: Aug 2010
Location: The Paths
Posts: 39,360
Hogwarts RPG Name: Anna Walles
Hufflepuff
Sixth Year
Hogwarts RPG Name: Sage Ransom-Kruus
Slytherin
Sixth Year
Ministry RPG Name:
Charles Hollingberry
Minister's Office
Ministry RPG Name:
Airey Flamsteed
Mysteries
Diagon Alley Employee:
Zachaël Lufkin
Owl Post
x12 x12
astronomizzle ♧ gryffinDORK | & the rest is drag ♣ #badluckDerf
COLORING ADVICE FROM ROSE! *runs around all excited like*
and yaaaay for a new round! This one is going to be HARD to narrow down pictures for
__________________
When youre stuck in a moment and your spark has been stolen .................................................. ........... this is our time to own it, so own it..................................... baby we were born withfire and gold in our eyes
Professor Pink | Mrs. Bruce Wayne | I'm on a Goat | Glitterpuff | Dumbledore's Defense Squad | BHB
Hey guys, just a reminder that you have about THREE DAYS to get your entries in! Get 'em in! October 31 is the deadline and I NEED MOAR ENTRIES!!!!
__________________
yeah, there's one thing about me that you should know________________________________ __________________________________________that I can't help from speaking my mind
Professor Pink | Mrs. Bruce Wayne | I'm on a Goat | Glitterpuff | Dumbledore's Defense Squad | BHB
I HAVE EXTENDED THE DEADLINE. Attention, people, you now have until November 3rd at 12:01 am EST to GET YOUR ENTRIES IN!
Thank you. Please enter. Thanks.
__________________
yeah, there's one thing about me that you should know________________________________ __________________________________________that I can't help from speaking my mind
Zombie Apocalypse Team Leader ★ ★ in a crown of pepperoni and artisan cheese
Yay. *just submitted*
__________________
We live in cities you'll never see onscreen..._______________________________________________
So very pretty, and we sure know how to run things..._______________________________ Livin' in ruins of a palace, within our dreams...____________
We're on each other's team._____
Professor Pink | Mrs. Bruce Wayne | I'm on a Goat | Glitterpuff | Dumbledore's Defense Squad | BHB
I want to wear ALL OF THESE. So pretty!
An Icon Competition Featuring the Word "FALL"
01. 02. 03. 04.
05. 06. 07. 08.
09. 10. 11. 12.
13. 14. 15. 16.
17. 18. 19. 20.
21. 22.
Vote for your favorite FOUR icons.
Do NOT vote for your own icons.
Entries are ANONYMOUS. Do NOT tell people which are yours or post/tweet/VM/IM/etc. clues about your entries. Also do NOT reveal your VOTES.
You have five days from the date and time of this post to vote.
Good luck to all!
__________________
yeah, there's one thing about me that you should know________________________________ __________________________________________that I can't help from speaking my mind
Last edited by BanaBatGirl; 03-02-2014 at 07:44 PM.
Professor Pink | Mrs. Bruce Wayne | I'm on a Goat | Glitterpuff | Dumbledore's Defense Squad | BHB
Quote:
Originally Posted by Lizasaurus
I went to vote and it said I already did *wibbles* no I hadn't.....
That's weird. o_O I just randomly clicked on three entries and it allowed ME to vote.
I can edit the poll though, if you'd like, to include your votes and to take out mine. Just PM me which ones you wanted to vote for!
__________________
yeah, there's one thing about me that you should know________________________________ __________________________________________that I can't help from speaking my mind
Professor Pink | Mrs. Bruce Wayne | I'm on a Goat | Glitterpuff | Dumbledore's Defense Squad | BHB
OKAY EVERYONE! We had some issues with the poll and I also left out two entries.
SO PLEASE, re-VOTE! SO SORRY, again, my sincerest apologies to EVERYONE.
__________________
yeah, there's one thing about me that you should know________________________________ __________________________________________that I can't help from speaking my mind
Professor Pink | Mrs. Bruce Wayne | I'm on a Goat | Glitterpuff | Dumbledore's Defense Squad | BHB
Hi everyone! I am SO SO SO SO SO SORRY for the long delay. The holidays + end of the quarter were CRAZY for me. I'm glad that's over and done though.
Round Four
Third place goes to the awesome Roselyn!
In second place we have the lovely sarahlooo!
In first place, our winner is.... Roselyn!!!!!
Congratulations to all who entered and voted, and again, thank you ALL for the fabulous turnout!!!!! A complete list of who entered what is below. Please remember to credit the graphics-makers if you wear their icons.
Sorry I did not reward our fourth-place winners this time; we had a two-way tie between two icons by hermygirl. Great job though, everyone!
Next challenge + advice from our fourth, second-place winner will be posted soon!
__________________
yeah, there's one thing about me that you should know________________________________ __________________________________________that I can't help from speaking my mind
The above image must be prominently featured in your icon.
You are allowed to enter up to TWO 100 x 100 and under 20 kb icons.
Entries are ANONYMOUS. Do NOT tell people which are yours or post/tweet/VM/IM/etc. clues about your entries.
You have NINE DAYS from the date and time of this post to PM me your entries. So let's say your entry should be in by February 3 at 8:50pm EST.
Good luck!
Our last winner, sarahlooo, had this great advice for us on how she made the second place icon in 1w1p: round four.
SPOILER!!: advice/tip!
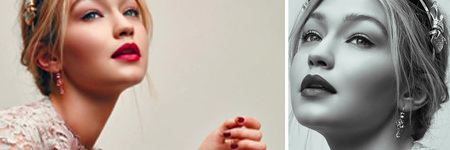
For my little bit of advice, I'm going to show you how to add a little more color to your photos by adjusting the black in the Selective Color tab. By adjusting the black, you can add different tints to the shadows to give it a certain feel. What I did in this photo was adjust the magenta into the negatives to create a green-ish tint to the darker parts of the photo.
I start with my photo with all other effects applied. It doesn't really matter what step you do this in, but this is usually the last step for me.
Go to Adjustments > Selective Color and select "Black" from the drop-down menu. Your options will be Cyan, Magenta, Yellow, and Black. Moving the arrow or any color to the right will increase the amount of that color in the black in your photo. Moving the arrow to the right will decrease the amount of that color and in turn, increase the amout of the opposite color. For example, decreasing Cyan will increase the Red. Decreasing Magenta will increase the Green. Decreasing Yellow will increase the Blue, and decreasing the Black will increase the White.
For this particular image, I chose to increase the Green by setting the Magenta to -16. You may have to use a larger amount depending on your photo, but it's as simple as that!
before ---> after --->
Good luck to all entering Round Five! Hope this tip helps!
__________________
yeah, there's one thing about me that you should know________________________________ __________________________________________that I can't help from speaking my mind
Professor Pink | Mrs. Bruce Wayne | I'm on a Goat | Glitterpuff | Dumbledore's Defense Squad | BHB
Hey all! Today is FEBRUARY 1st, so that means you have TWO DAYS remaining to PM me your entries!
Don't miss out! Remember, 1W1P is currently the only active graphics competition still running in Madam Malkin's! Don't let it die!
__________________
yeah, there's one thing about me that you should know________________________________ __________________________________________that I can't help from speaking my mind


 →
→ 
 →
→ 

 x10
x10


")


 x12
x12


 ____________
 02.
02.  03.
03.  04.
04. 
 06.
06.  07.
07.  08.
08. 
 10.
10.  11.
11.  12.
12. 
 14.
14.  15.
15.  16.
16. 
 18.
18.  19.
19.  20.
20. 
 22.
22. 

 Just PM me which ones you wanted to vote for!


 I'd love to help if you need someone to stay ontop of it! /loves graphics challenges!!


 after --->


