If this is your first visit, be sure to check out the FAQ by clicking the link above.
You may have to register before you can post: click the register link above to proceed.
To start viewing messages, select the forum that you want to visit from the selection below.
Couture ClosetWhether you want to show off your craft magic or showcase your original artwork, this is the place for all our SS creators to share their talents.
Looking for a fun new hands-on skill to master? Then this is the place to be! This thread is a collection of creative tutorials made for the SS community by the SS community.
It's important to note that this thread is not limited to any one person: this is for EVERYONE. Anyone and everyone is encouraged to come and add in their own tutorials and helpful tips, no matter which craft it falls under. Please do not post any graphics or digital art tutorials in this thread. Those belong in the Sewing Lessons tutorials thread!
However, we do have some rules in place so please make sure to read the rules below!
CREATORS:
Make sure your tutorials are clear and easy to understand
Please list any equipment you're using to make it easier for the user
If you're using someone else's work from outside of SS, please make sure to credit the creator
Make sure your images are within the SS size requirements: 350x350 pixels and 60kb. If they're bigger, make sure to place them in a photocut or a spoiler tag:
[photocut=la dee da]images go here[/photocut]
[spoiler=la dee da]images go here[/spoiler]
No plagiarising. At all. Anyone found plagiarising will have their post deleted and will receive a site warning/infraction. Just don’t do it
ASPIRING CREATORS:
Please do not add comments to this thread. If you like someone’s tutorial, please make sure to personally contact the creator or make use of the Evaluation Station
If you’re using a technique taught by someone, please make sure to give some kind of recognition to them
Please do not ask questions in this thread. Instead hop on over to the Evaluation Station for such things. Or you can contact the creator of the tutorial directly!
As always, make sure to keep the SS and Gladrags rules in mind! If you’re looking for any old resources, they can be found right here. If you have any questions or concerns, please make sure to contact one of your Gladrags mods and we’ll be happy to help you out.
Becky's Bestie | Magic Pen Original Nymphadora | Lizasaurus
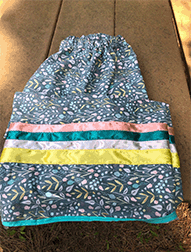
Ribbon Skirt
As soon as I have a chance I will post more pictures below of how it is being created, so any parts that you are not sure on will have a picture to go with it.
TUTORIAL! Materials:
Preferred fabric, 1-3 yards depending on size
thread
sewing machine
ribbon(s) (I usually use 3-5 of them, and nothing smaller than 7/8" in width
Peel and stick tape
measuring tape
scissors
fabric cutter
cutting mat
straight edge
Pins
Iron
Large safety pin
bias tape
elastic (2-3 inch width)
Preparation
Measure your waist, depending on where you want your skirt to hang, and take the measurement from the widest part either the waist or hips
Take that number and add 15" (ex. 35" waist adds 15" 35+15=50) this will be the width of the fabric you need. So the number of yards.
Divide this number by 4 (ex. 50/4=12.25)
Measure your leg from where it will sit on your waist/hips to where you want it to fall to whether it's shin, calf, ankle, or even knee
Take that number and add 4" ((ex. 15" leg adds 4" 15+4=19) this will be the height of the fabric you need to cut it to.
Find a nice fabric. If you use a stretchier fabric than polyester or cotton you will need to adjust the sizing
Don't worry about cutting it to size yet
Fold your fabric in half the long way.
Fold it in half again. This will be 1/4 of the amount around the waist. You still need to trim however
Lay the fabric out on your cutting mat, with the folded part away from you
DO NOT cut that edge, or you will cut your skirt into 4 panels. We only want 2.
Using your measuring tape adjust the end with the two pieces not the other fold until the two folds measure the number you got in in #3
Measure it out so that it is even all the way across when you cut. Using your fabric cutter & straight edge, cut off the excess as well as that folded edge (not your main folded edge, the edge with the folded part and two nonfolded pieces
Now measure the length of the skirt with the number from #5. Cut off the excess
When you open your fabric now there will be two pieces
Lay out your ribbon how you would like it to look. You have two options here. If you want them to lay side by side like in my picture or if you want them to be separated as in this picture
Measure out the ribbon across the width of the fabric on one front of the skirt panel. Make sure that it is even from the bottom, across where you would like the ribbon to sit on your legs.
Leave extra ribbon on the ends by 2-3 inches or more if you wish to let ribbons hang on the sides of the skirt
Once you are happy with where the ribbon will be tack it down with your peel and stick tape.
Do this with all the ribbon you are using on the panel
Put the skirt backs together and make sure your ribbon on the second panel is in the same location on the panel as the first panel
Tack the ribbon on the second panel down
Sewing
Prep your sewing machine. Use a thread that will blend in well for the ribbon, unless you want it to stand out. You could even change the threads for each one as needed
Using a wave stitch, sew the top and bottom of each ribbon if they are separated, or the top ribbon and each connecting ribbon, and finally the bottom ribbon to the skirt
Separate your skirt panels
Do the same on the second skirt panel with the ribbons
Get your pins, and starting right where the ribbons are pin the two panels together
Continue pinning just the ribbon area. Then complete pinning all the way up the skirt to the waist as well as the bottom of the ribbons to the bottom of the skirt
Do the same to the other side of the skirt, again starting the pinning at the ribbon
Place the two front sides of the skirt together
Do a straight stitch either from the top of the skirt to the bottom or bottom to the top about an inch away from the edge, removing the pins as you go
Trim off the excess ribbon
Using your hem stitch and presser foot, create a hem along the edge of the skirt going from top to bottom or bottom to top
Do the same on the other side of the skirt
Using the straight stitch again, sew the bias to the bottom of the skirt
Make sure the longer edge of the bias is on the inside of skirt
Fold over the top edge of the skirt about 2 inches (or a little over the height of your elastic)
Use an iron to smooth this new bias of two inches you are creating. Make sure both front and back measure the 2 inches
Do a straight stitch almost all the way around the top hoop of the skirt Sew close to the two inch edge so the elastic will fit inside the pocket. You are creating the top bias. Stop about 5 inches from the start of the sewing of the hoop of your skirt
Take a large safety pin and attach it to the elastic
Thread the elastic into the top edge bias through that 5 inch hole until it comes out the other end
Depending on how tight you wish the skirt to be, adjust the elastic for comfort
Once you are happy with the width of the waist, sew a square connecting the two ends of the elastic
Sew the 5 inches of the top bias closed
You now have a beautiful ribbon skirt!
Last edited by Nymphadoraliz; 07-09-2019 at 01:36 AM.
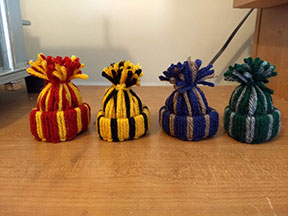
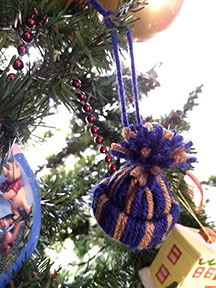
I came across this adorable little craft here, and thought I'd try it out with the Hogwarts house colors. It's super cute and super easy, so I thought I'd share it with my crafty friends of SnitchSeeker with pictures and instructions.
Just a few days left till Christmas, but these make great ornaments! Or maybe tie one onto a wrapped gift in lieu of a bow. And these would even be cute as a doll hat lol. Or just set among your Hogwarts decor and memorabilia.
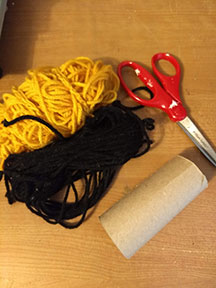
Materials Needed:
Cardboard tube - from toilet paper or paper towel or wrapping paper
Yarn - these don't take a lot of yarn, so you can use scraps if you already have some, or whatever you can find at a discount store will work just fine
Tissue paper, or a tissue or napkin, or any "soft" paper
Scissors
Instructions:
SPOILER!!: Step by step with pictures
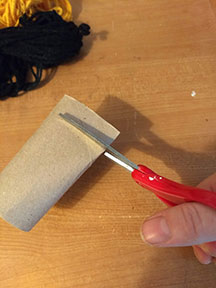
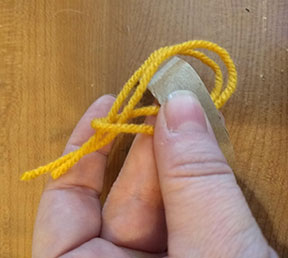
1. Cut a strip from your cardboard tube. You only need a fairly thin strip. My tube was from a roll of toilet paper and I was able to cut four, with some left over.
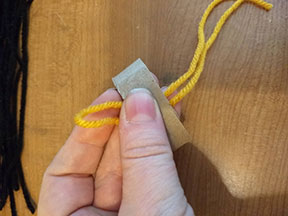
2. Cut your yarn into even lengths. The number and size may depend on the size of cardboard tube you have and the thickness of your yarn, so experiment with that. But for reference, I cut my yarn to about 12 inches or 30 centimeters, and I needed 18 pieces for the primary color and 9 pieces for the secondary color.
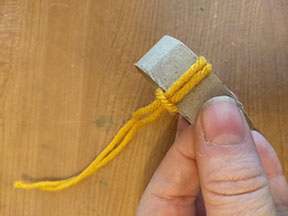
3. Take your first piece of yarn and fold it in half. Place it under the tube with loop sticking out at one side. Then take the two end pieces, wrap them over the top of the tube and through the loop, pulling taut to secure the yarn.
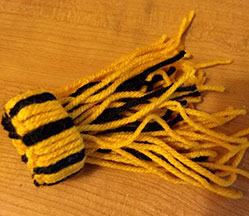
4. Repeat step 3 until the entire cardboard tube is covered. I did a pattern of two primary color and one secondary color for each of the houses, but if you prefer your stripes to be the same size, of course you can change that and do whatever you'd like.
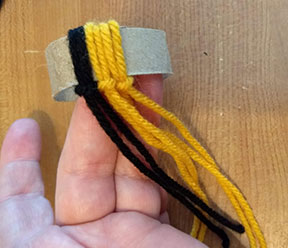
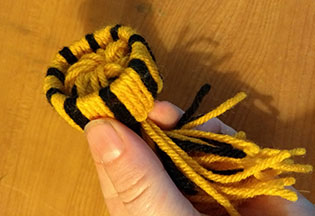
5. Now grasp all of the lengths of yarn in one hand, twist them all together, and push them up through the tube to the other side. This will give the little hats the appearance of having them cuffed on the bottom. The first pic is in the process of that step - it was tough getting a good picture of that with one hand lol, so I hope that makes sense.
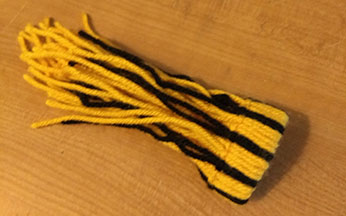
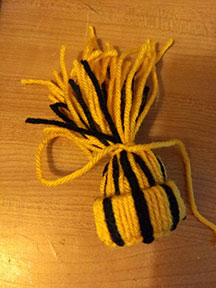
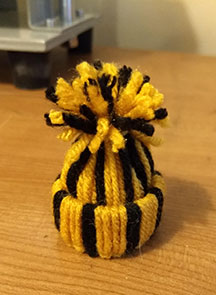
6. At this point, I tried to straighten all the stripes. Then take a small piece of tissue paper (or any type of "soft" paper), ball it up, and place it inside the hat to retain the shape. Take another piece of yarn and tie all the pieces of yarn together. Trim them to make the pom-pom top. Et voila! A mini yarn hat!
7. If you'd like to make this an ornament for your tree or to tie onto a wrapped gift, simply tie and loop another piece of yarn under the pom-pom.
If you have any questions or something does not seem clear, feel free to privately message me. And if you decide to make one, please show me!
__________________
started like a knight in a fairytale_______________________________________________
ended like a moth in flames______________________ ______________________don't you worry I'll be fine _________________________________________________you were good for the plot line
Wizarding World RPG Admin Gladrags Mod Minister for Magic Alley Proprietor
Leprechaun
Join Date: Aug 2010
Location: The Paths
Posts: 40,845
Hogwarts RPG Name: Professor Cox
Ravenclaw
Graduated
Hogwarts RPG Name: Briallen Ashburry-Hawthorne
Gryffindor
Third Year
Hogwarts RPG Name: Nyle Harden
Hufflepuff
Fourth Year
Hogwarts RPG Name: Iris Harden
Ravenclaw
Fourth Year
Hogwarts RPG Name: Calliope Barrington
Slytherin
Third Year
Ministry Department Head:
Charles Hollingberry
Minister's Office
Ministry Department Head:
Airey Flamsteed
Mysteries
Diagon Alley Proprietor:
Zachaël Lufkin
Owl Post
x12 x12
astronomizzle ♧ gryffinDORK | & the rest is drag ♣ #badluckDerf
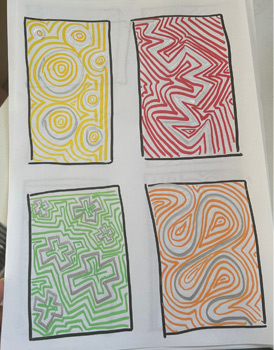
ZENTANGLES a very veeeeeery basic introduction
What can I say...my FYP on TikTok came through BIG time during a recent week of emotional chaos and I stumbled into a new little 10 minute daily meditation I thought would be fun to share with SnitchSeekers members. Enter Zentangles. They've been around for a while, and in the simplest sense they're "a structured drawing method designed to help you relax, focus, and enjoy the creative process."
If you Google them though.... youll probably be hit with wildly intricate masterpieces that can make you wonder where on earth to even start. Thats where TikToker Lizi Phoenix swoops in, breaking things down to their bare bones and inspiring me to carve out just 10 minutes a day either to launch into my morning or to wind down before bed.
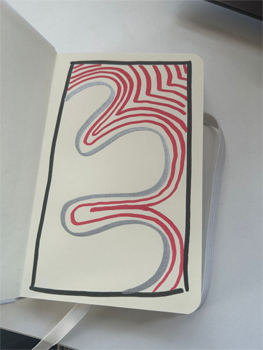
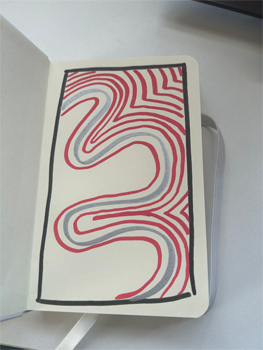
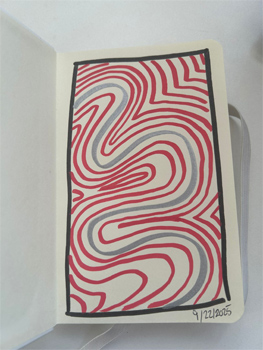
Im still a total beginner so my lines and composition are very messy and far from polished, but we all have to start somewhere and a little mess is just fine For this tutorial, I'll share one of the methods she introduced in her four-page spread exercise (see my very first attempt up top) starting with nothing more than a squiggly line.
REQUIRED MATERIALS: paper something to write with
I used a small art creation sketchbook and Shuttle Art acrylic markers
Text Cut: see the full journey here with step-by-step pictures
STEP ONE: pick some calming/peaceful music of your choice
No, for real. I have tried to draw zentangles with different kinds of music and your background noise really REALLY makes a differences. I found I need soft ballads to relax myself into a state where I don't feel the urge to rush - faster songs make me want to match the pace of the music with the movement of my pen and the point of zentangles is to be mindful and precise about your movements, to slow down and relish in the process. This particular zentangle was done with Into the West by Annie Lenox and Only Human by K playing.
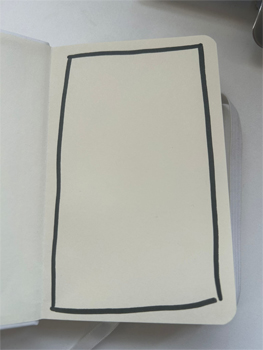
STEP TWO: draw a rectangle/square on your paper of choice
I'm using a little notebook to hold a single zentangle. The point is to break up the page, even subtly, so you are not looking at the page like a final piece that has to be perfect and full - lines do not have to be straight to avoid trying to be a perfectionist with rulers too!
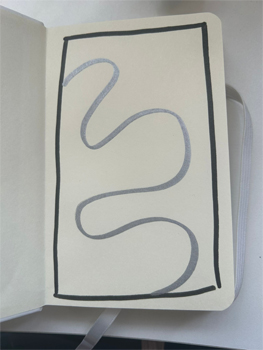
STEP THREE: draw a squiggly line
Start from one side of your square/rectangle and wiggle it all the way to the otherside - just go with the flow and don't overthink it!
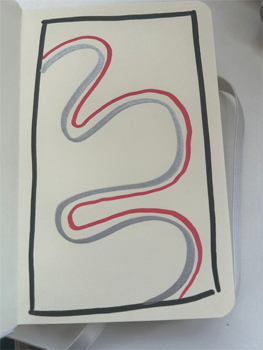
STEP FOUR: outline your squiggly line starting from the 'top'
I used a different color for the outline color just so I could see where my inspiration started and where it ended up, but you can absolutely use the tool you did for the line. You want to leave about the same amount of space along the entire outline (here is where that mindfulness and precision come in!) and try not to lift your hand from the paper so it is all one fluid line (mistakes are okay!)
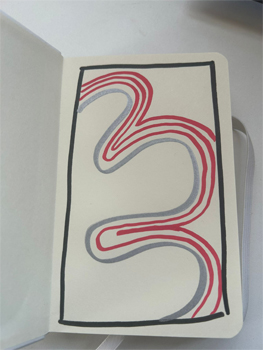
STEP FIVE: keep tracing, following only your latest line
When you hit a barrier, like the border, that line stops and you go back to the beginning of your line to keep following that line. You only need to focus on your most recent line until you have completely filled the space above your initial line. I misjudged just how much space was available there in second inward curve and wish I hadn't gone in so deep but oh well!
STEP SIX: start outlining below your initial line
keep following your most recent line and as you do so you may find that you create some negative shapes as lines get too close to one another. That's totally fine and just adds to the uniqueness of your zentangle. If there is enough space within that negative space, you can follow the shape of the lines inside it. If not, then just leave it as is for some extra dimension.
STEP SEVEN: all done!
__________________
We broke into a million pieces, and we can't go back.........................................
But now we're seeing all the beauty in the broken glass.....................................
The scars are part of me, darkness and harmony
My voice without the lies, this is what it sounds like


.jpg)


 x11
x11  x11
x11


 For this tutorial, I'll share one of the methods she introduced in her four-page spread exercise (see my very first attempt up top) starting with nothing more than a squiggly line.